Binding lists with Android and MvvmCross
18 Jan 2017Recently i gave a Xamarin/MvvmCross training for one of our clients. During this training there was an assignment on which we would use MvxRecyclerView to display a list of items that we took from a webserver. There where however some issues, in this blogpost i would like to clear up on how to bind a list of items for Android an iOS.
In Part 1 we will target Android and part 2 will target iOS. The same core project will be used throughout these blogposts. The source code is available here: https://github.com/MarcBruins/MonkeyList/
Prequisities
Before we start we need to setup a MvvmCross solution with a Core project and an Android/iOS project. If you don’t know how, then check out out this video by Jonathan Roux. The first two minutes will show you exactly how you should start. Also make sure you have MvvmCross 4.4.0 or higher. There is also a textual explanation available here
Lets build the app!
Now that we are setup we are ready to go. We are going to create an MvvmCross app that shows a list of monkeys(what a surprise)! In order to do that we need the following:
- Create a new ViewModel called “MonkeysViewModel”
- The MonkeysViewModel should have a bindable list(MvxObservableCollection)
- Create an Android view with a MvxRecyclerView with templates to display the monkeys
- Create an iOS view with a TableView to display the monkeys
The Core project
The MonkeysViewModel will be a really simple ViewModel. Real life scenarios would probably be different but the principles are the same. We will add a new model called Monkey and a MvxObservableCollection on which the views will be able to bind.
Create a new Model called “Monkey”
Create a new “Models” folder in the Core solution if you don’t already have one and create a new class called “Monkey” with the following properties:
Create a new ViewModel called “MonkeysViewModel”
Right click your ViewModels folder in the Core solution and create a new class called “MonkeysViewModel”. Let it extend MvxViewModel. Also create a MvxObservableCollection property named “Monkeys” which has a generic value of “Monkey”. Now you will be able to add some monkeys!
Your ViewModel should be something like this:
Also make sure that your AppStart points to the “MonkeyViewModel”.
The Android project
In the Android project we will add a new view called “MonkeyView” and bind it to the ViewModel. In the layout we will add a MvxRecyclerView and bind that to the MvxObservableCollection. The MvxRecyclerview will take a template that will display our monkey data!
Setup
Before we start we need to add some nuget packages to make this work. We want to use the MvxRecyclerview and thus we have to add it to the project.
Add the following packages to your Droid project:
- MvvmCross.Droid.Support.V7.RecyclerView
- Xamarin.Android.Support.v7.CardView (yes we are using cardview!)
- MvvmCross.Plugin.DownloadCache (we will use this to download an image and display it)
- MvvmCross.Plugin.File (the downloadcache caches on the file system with the help of this package)
*Note that you should accept the sub-packages as wel.
Add the MonkeyView
Right click on your views folder and a new Activity called “MonkeyView”:
MonkeyView.cs
With this activity is of course a corresponding layout that we need to create. We will add the MvxRecylerView to this layout so that we can bind our ObservableCollection to it:
MonkeysView.axml
Some important things to point out are the MvxItemTemplate and the MvxBind.
The MvxItemTemplate will bind every item in the ObservableCollection to the layout that is selected in here. Note that we still need to add this layout(that’s the next step). The MvxBind will bind our ObservableCollection called “Monkeys” as its itemsource. By doing this we don’t have to write our own adapter because MvvmCross already took care of it!
Multiple templates
In some cases you might want to be different templates. That is entirely possible with MvvmCross and its TemplateSelector. More information on how to use this can be found on this great blog post.
Create a template
With the MonkeyView created the only thing that we still need to do is to create a template. Fortunately that is very easy to do because it’s only a layout file. In this blogpost i will create a layout file which uses a cardview to display the data:
listitem_monkey.axml
A few things to point out here are:
- The MvxImageView takes care of the Image and will download it and caches it
- In this template layout we bind to the properties of the type that is defined in the MvxObserableCollection in our case it’s the Monkey class
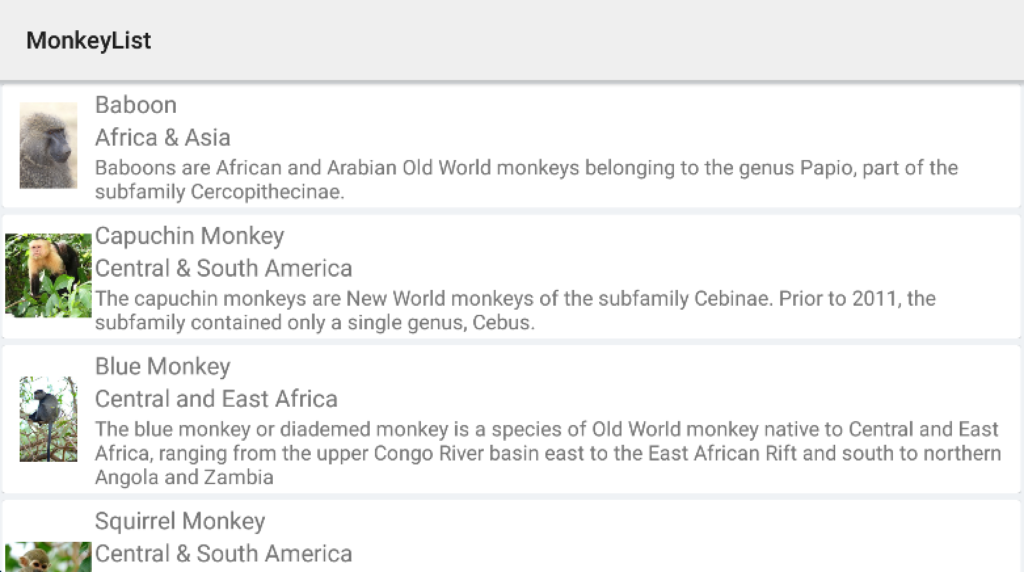
We are done for android! Go on an build the project to your phone/emulator. Tada you should have a beautiful list of monkeys:
Optimisation tip!
The MvxRecyclerView is loaded by using reflection. Reflection is not the fasted there is. If we want to make it easier for ourself and make the MvxRecyclerView faster we can load the assembly manually in the setup.cs:
To use this we simple replace the MvvmCross.Droid.Support.V7.RecyclerView.MvxRecyclerView with MvxRecyclerView.