MvvmCross Hamburger menu for iOS
29 Jan 2016This has been deprecated. MvvmCross 5.0 changed the way this works. Please checkout the sample source. If you are on 4.4 this still works fine
There is a lot of demand for the so called “Hamburger” menu nowadays. On default it is supported by Android but not by iOS. Fortunately there are a lot of folks on github who have made a hamburger menu for iOS and these implementations have been made available for Xamarin and MvvmCross. This article will show how easy it is to implement a hamburger menu for a MvvmCross based project.
The result out of this post will be a basic iOS hamburger menu for MvvmCross which you can customize to your heart’s contents. For a complete customized sample please see the github page: https://github.com/MarcBruins/MvvmCross-Sidebar-Sample/
Xamarin sidebar vs JASidePanels
In MvvmCross iOS there are two existing packages which can be used. Xamarin Sidebar and JASidePanels. The difference is mainly UI based. Both the JASidepanels and the Xamarin Sidebar have the ability to create two menus. One for the left side and one for the right. Furthermore JASidepanels uses a UINavigationBar on the Menu view and Xamarin sidebar does not.
The nice thing that the iOSSupport package has to offer is that you can switch implementations by editing only one line of code!
| JASidePanels | Xamarin Sidebar |
 |
 |
Setup
Before we start we need to setup a MvvmCross solution with a Core project and a iOS project. If you don’t know how, then check out out this video by Jonathan Roux. The first two minutes will show you exactly how you should start.
For the same steps but in text checkout his blogpost: http://jonathanroux.com/2016/02/09/mvvmcross-4-and-xamarin-project-setup/.
Usage
By now you should have a Core project and an iOS project and we can start implementing the menu. We will be using the Xamarin Sidebar at first and later on i will explain how to add the JASidePanels component.
We are going to create the Views and a Viewmodels for the content and also for the menu. To let MvvmCross know that is indeed a hamburger menu we are going to add attributes in our views. That should be all. Lets start!
ContentViewModel
This will be the main ViewController which will hold the content that you want to show in your app (duh).
- Add a new class to your ViewModels called “ContentViewModel”
- Let the class extend “MvxViewModel”
- Add a public function called ShowMenu that navigates to the MenuViewModel
The result should be something like this:
1 2 3 4 5 6 7 8 9 10 11 12 13 14 15 16 17 | using System;using MvvmCross.Core.ViewModels;namespace SideBarSample.Core.ViewModels{ public class ContentViewModel : MvxViewModel { public ContentViewModel () { } public void ShowMenu() { ShowViewModel<MenuViewModel>(); } }} |
The project will not compile saying that there is no MenuViewModel. That is correct, our next step is to fix this error by adding the MenuViewModel.
MenuViewModel
The menuviewmodel will be the viewmodel for our menu.
- Add a new class to your ViewModels called “MenuViewModel”
- Let the class extend “MvxViewModel”
The result should be something like this:
1 2 3 4 5 6 7 8 9 10 11 12 | using System;using MvvmCross.Core.ViewModels;namespace SideBarSample.Core.ViewModels{ public class MenuViewModel : MvxViewModel { public MenuViewModel () { } }} |
Appstart
The last thing we will do in the Core project is setting the ContentViewModel as the start ViewModel of our app. This is done by changing the App.cs file:
1 2 3 4 5 6 7 8 9 10 11 12 13 14 15 | namespace SideBarSample.Core{ public class App : MvvmCross.Core.ViewModels.MvxApplication { public override void Initialize() { CreatableTypes() .EndingWith("Service") .AsInterfaces() .RegisterAsLazySingleton(); RegisterAppStart<ViewModels.ContentView>(); } }} |
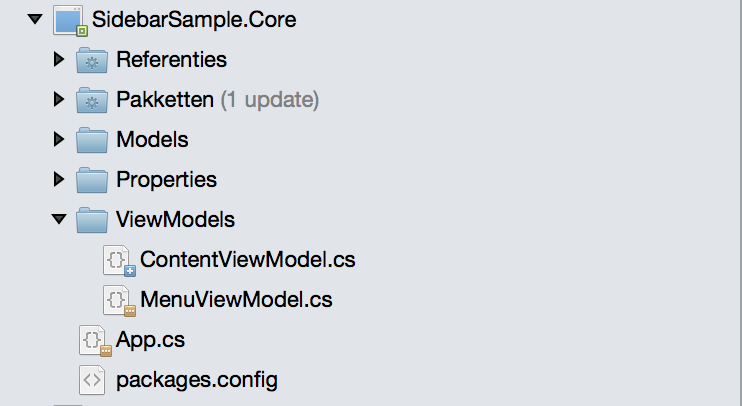
Your core project should look something like this now.
Boom! That should be all for the core project! Lets move on the the iOS project and create the corresponding views!
Views
We are going to create our views by using .xibs but if you rather have storyboards that should also be possible. Before we start adding them we need to install the nuget packages. After that we will be creating the views and bind them to the viewmodel just like you would do it normally. Finally we will be using the MvxPanelPresentation attribute and the XamarinSidebar package to create the hamburger menu!
Add xamarin sidebar
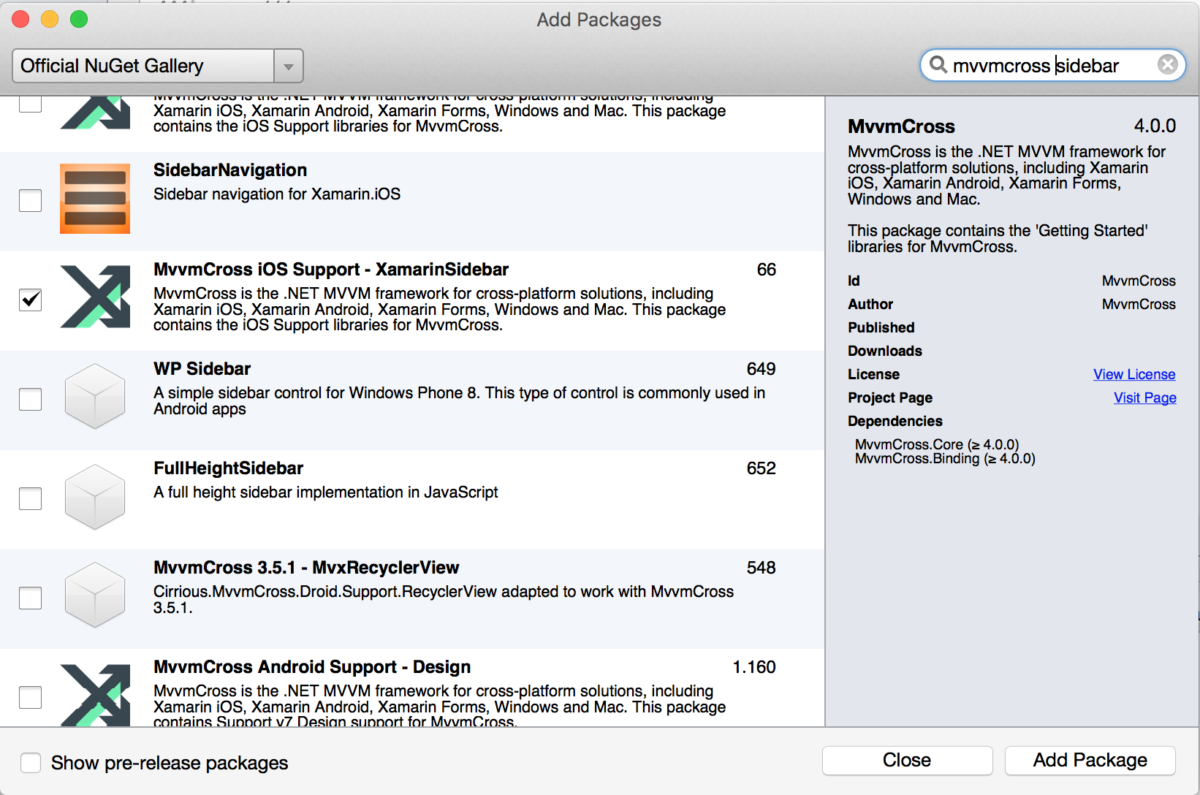
In Xamarin studio right click your iOS project and go to “Add” -> “Add Nuget Packages”
- Search for “Xamarin Sidebar” and select the package
- Finally click “Add Package” and make sure MvvmCross iOS Support is included. This will install the XamarinSidebar package and the iOSSupport core
MvxPanelPresentation
There are a few core concepts about MvxPanelPresentation that are important to understand. MvxPanelPresentation is an attribute that allows you to define the nature of the view you are creating by defining its parameters. It will look something like this:
1 2 | [MvxPanelPresentation(MvxPanelEnum.Center, MvxPanelHintType.ResetRoot, true)]public partial class CenterView : MvxViewControllerContentViewModel |
MvxPanelEnum
The MvxPanelEnum will place the view on the side that has your preference.
1 2 3 4 5 6 7 | public enum MvxPanelEnum{ None, Center, Left, Right} |
By setting it to Right the menu will be displayed on the right side. By setting it to left it will be displayed on the left. The JASidepanel supports both right and left. The contentview will be the center of your app and will use the Center enum value.
MvxPanelHintType
MvxPanelHintType is an enum that tells something about the behaviour of the view.
| ResetRoot | The ResetRoot will replace any existing contentview and make the new view with this value the root. |
| PopToRoot | The PopToRoot will make sure that the navigation stack views pops the view on the stack until it reaches the root. After that the view will be displayed as the rootview. |
| ActivePanel | The views attributed with the ActivePanel value will be pushed on to the navigation stack. You can think of it as a detail view which has the back arrow on the top left corner. |
showPanel
A boolean value if you want to show the panel or not.
ContentView
First lets create our contentview:
- Right click on your views folder in your iOS project and add a new ViewController called “ContentView“
- Extend MvxViewController and let MvvmCross know that it belongs to the ContentViewModel by setting the generic parameter.
- Add the MvxPanelPresentationAttribute
- In the MvxPanelPresentationAttribute set MvxPanelEnum to Center
- In the MvxPanelPresentationAttribute set MvxPanelHintType to ResetRoot
- Set the ShowPanel value to true
- Call the ViewModel.ShowMenu() function from within you ViewDidLoad.
The result:
1 2 3 4 5 6 7 8 9 10 11 12 13 14 15 | [MvxPanelPresentation(MvxPanelEnum.Center, MvxPanelHintType.ResetRoot, true)]public partial class CenterView : MvxViewController<ContentViewModel>{ public CenterView () { } public override void ViewDidLoad () { base.ViewDidLoad (); // Perform any additional setup after loading the view, typically from a nib. ViewModel.ShowMenu (); }} |
MenuView
And now our final view. This view is going to be very basic but you can customize it anyway you want. Note that you can create a left and a right menu view. We will be creating a left menuview for now but you can repeat this process for a right side menu.
- Right click on your views folder in your iOS project and add a new ViewController called “MenuView“
- Extend MvxViewController and let MvvmCross know that it belongs to the MenuViewModel by setting the generic parameter.
- Add the MvxPanelPresentationAttribute
- In the MvxPanelPresentationAttribute set MvxPanelEnum to Left
- In the MvxPanelPresentationAttribute set MvxPanelHintType to ActivePanel
- Set the ShowPanel value to false
The MenuView.cs:
1 2 3 4 5 6 7 8 | [MvxPanelPresentation(MvxPanelEnum.Left, MvxPanelHintType.ActivePanel, false)]public partial class MenuView : MvxViewController<MenuViewModel>{ public override void ViewDidLoad () { base.ViewDidLoad (); }} |
We’re almost done!
The last thing we should do is to tell MvvmCross that is should use the Presenter that handles the navigation:
Setup.cs:
1 2 3 4 5 6 7 8 9 | public class Setup : MvxIosSetup { //......... the default methods protected override IMvxIosViewPresenter CreatePresenter() { return new MvxSideBarPresenter((MvxApplicationDelegate)ApplicationDelegate, Window); } } |
If you want to use JASidepanels just add the nuget package and change the presenter:
1 2 3 4 5 6 7 8 9 | public class Setup : MvxIosSetup { //......... the default methods protected override IMvxIosViewPresenter CreatePresenter() { return new MvxSidePanelsPresenter((MvxApplicationDelegate)ApplicationDelegate, Window); } } |
Thats it, were done! We have create a hamburger menu that we can fully customize and we can switch implementations by changing only one line of code. Now go ahead and make some beautiful menu’s!